The Harry Potter Birthday Party
- Tina
- Feb 10, 2021
- 9 min read
Updated: May 24, 2021
I Solemnly Swear We Were Up to No Good

When we decided on the Harry Potter theme for my son's 7th birthday party, I had to decide to narrow down our focus to the first book/movie, "Harry Potter and the Sorcerer's Stone."
I had not yet read the book and needed a quick visual, so I took notes while watching the movie. I always want my guests to have a great time but if I did not get this party right, my little experts would respectfully call me out. I did not want them looking for discrepancies, but to feel like they were in a magical place themselves.
All links to craft instructions and supplies are in the footnotes.
First step, the invitations. I had so many items to make for this party that I ordered the invitations. I ordered the invitations, shown below, from Etsy. (1) You can personalize these to suit your party details. I then sealed them with a Hogwarts wax seal (2)

Once sealed, I tied the ribbon from the balloon around the invitation using the idea below from One Creative Mommy (3) and delivered the invitations via "Owl Post." (hand delivery) l left it at the front door of our guest's homes. I gave the parents a heads up to not answer the door until we drove away, so their child could "find" the invite. The feedback from the parents was positive. I love doing fun and unconventional invitations.

Allow me to take you on a tour of our party starting at the front door.
Our guests had received their invitations and arrived at the 9 3/4 platform (our front porch). I bought a photography backdrop (3), which looked like a brick wall. I made a "Y" cut into the center of the paper. You can get door coverings, which come with a 9 3/4 label, but I had found that not all of them were long enough to cover the entire doorway. That was a must for me, so I ordered a backdrop which reached the threshold of the door and cut it to size. I found a 9 3/4 image on Google to print out and attached it to the top.
Off to the side of the door was a wood table and two suitcases I already had. I bought the third suitcase at an antique mall. I also found this amazing birdcage at an antique store and kept it as decor in my home after the party. A friend of my son loaned us the owl which was purchased from Universal Studios.

I kept the front door open so the guests could walk "through" the brick wall and into "Diagon Alley", the hallway inside our house.

The first feature inside the house was flying invitations. This was to mimic the invitations that came flowing through the front door mail slot of the house which Harry shared with his dreadful aunt and uncle. To make these I went on Google images and found photos of the front and back of a Hogwarts's invitation. I could have copied the invites I bought from Etsy but wanted them to be a rectangle shape. Overthinking? Yes, but some details I just cannot let go.
I cut out each envelope section, front and back, and made sure they matched in size on all sides. I put a sticky dot on the inside and in the center to adhere the fishing line to the invitation. I then glued the edges of the front and back invite covers with white glue and made garlands. I placed the envelopes at varying heights so each piece of garland would not look the same, to give that flying effect and not a curtain effect.
At the time of this party, I was redoing the piece of furniture you see in the background. I placed this in the doorway as a barrier to keep kids out of the office and a sort of backdrop to separate the modern office from the Diagon Alley hallway. I added an umbrella stand with old canes just because.
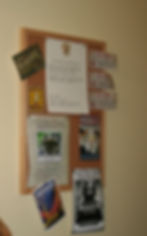
Next was a Hogwarts Bulletin Board. It looked like a typical board you may see in a school lobby with various postings. It was fun to make, and the kids loved reading it. I got the posters and memos through Google and Pinterest searches.
If you have read my posts on previous parties, you know I rarely give out goody bags as there are various items to take home throughout the party. First up were potion necklaces. I bought tiny plastic vials (4) and necklaces on Amazon. I filled the vials with green-tinted hand sanitizer. I put a dab of glue on the lid so the potion vial would stay put while the kids ran around at the party.

I added chocolate coins to a scale I already had for Galleons. The guests picked up their galleons and brought them to Ollivander's to purchase their wands. I did not actually take their chocolate money. They ate those quickly.

I had some friends come help make wands. We used separated chop sticks and hot glue to make various types of handles. I got the idea from Or So She Says (5). Once the glue was dry, we brushed the wands with brown and bronze shades of acrylic paint. No two were alike. Since this party was three years ago, I am having difficulty finding my source for these amazing wand labels. We wrapped the wands in brown paper and had our guest pick one at random. The wand inside was a surprise. Since no two were alike, they traded with each other if they wanted.
After choosing their wands, I invited our guests onto the back porch, where the wizardry was about to begin.

I knew I wanted a potion area, a lab, so to speak. I have been wanting to make bottles like these for so long, but with no reason to make them. I finally got the opportunity. I visited thrift, antique, dollar and craft stores to find various shape and size bottles. I went on Etsy and purchased labels. (6) I was about to redo this piece of furniture, so I used it in the decor. I bought the owls at thrift and dollar stores. I bought the bird cage from Facebook Marketplace. Some people will use decor one time for a party or wedding and then want to unload it all. That is the story for several birdcages I purchased for this party.


When making the potion bottles. I used the purchased Harry Potter labels and worked backwards. I looked up what each label was for and what it was supposed to look like and did my best. I also used some Halloween labels. I used tomato juice, water with food coloring and hand sanitizer. This party was before COVID, so hand sanitizer was not so scarce and it was affordable. I already had a lot of it because of my son always wanting to preserve bugs in jars. Hand sanitizer is safer than the alternative chemicals for preserving so we had some on hand. However, I needed to purchase more for the party.
For the above large green jar, I bought eyeball splat balls and put them into the jar with hand sanitizer for a gooier look. I was also worried water would take the eyeball print off the balls. For the bat droppings, I used black sand from the craft store. For Giggly water, I used water and fake plant parts. The possibilities are endless for this type of project.
If you are interested in making a display like this, look to see what you already have around the house. I already had the succulent plant, mortar and pestles, the concrete snake, books, baskets and lanterns. You can also find potion book covers online to cover books you already have.
The first treat was some potion punch. I bought a large plastic cauldron and put dry ice in the bottom. I put another large bowl on top of the dry ice and filled it with Sprite. Be sure to keep a glass of warm water close by to reactivate the dry ice as needed.
The parents helped by squeezing a drop of food coloring in the bottom of clear plastic cups. Kids lined up at the cauldron with those cups in hand. I let the kids see me take a potion bottle off the display which had been previously filled with Pop Rocks. It appeared I was getting a potion to add to the drink. When the children saw me dipping the ladle into the cauldron and adding the Pop Rocks, it gave them the sense that they were really drinking a potion. Smoke was flowing from the caldron, which meant they could not see the Sprite inside. After ladling the clear liquid into their cups, the food coloring was activated. I quickly added a sprinkle of Pop Rocks to the top of their drink. The drop of food coloring instantly turned the clear liquid to color and the Pop Rocks gave it that special chemical reaction I was going for. The kids loved it. We all got hit in the face several times with rogue Pop Rocks, so it may not have been the best idea.
(I told the kids not to drink from any bottles from the potion display)


Next it was time for each guest to be sorted into their respective Hogwarts House. I bought a sorting hat on Amazon and did my best sorting voice. I had asked the parents ahead of time which house their child wanted to go to, so there would be no crying if I, err, the Sorting Hat, made the wrong choice. Once they received the news, I gave them a bookmark with their house name to remind them of where to sit.


Where to sit?
Each house had its own table with it's own color. I used various candlesticks bought from thrift and dollar stores and small pots with succulents as decor for each table. The birdcages were from Facebook Marketplace.


On each plate the guests had their own mug, another keepsake. I bought these small mugs at Family Dollar and Decoupaged a Hogwarts label on them.

After getting sorted, it was time to eat. I am sad to say that I did not take a photo of the food table. I made a quidditch center piece you can see in the background in the picture below. I wanted to make themed food for the party, but we had burgers, hotdogs, and snacks foods.

Also, when designing the food table, I like to use boxes under tablecloths for various shapes and sizes. This gives the table more character. I place the food or decor on top of those boxes. You can see an example of that in the Indiana Jones party we threw in 2019. https://www.theroamingoctopus.com/post/indiana-jones-birthday-party
I mentioned mugs at each place setting. We bought the mugs to fill with vanilla ice cream and butter beer. I found a butter beer recipe online to make. I also purchased special bottles and labels. (7) If I floated the bottles in water and ice, the labels would have gotten ruined, so I opted to pull the butter beer bottles out of the fridge right as they were needed and added vanilla ice cream. I bought bottles with caps that did not need a bottle opener.

After food, it was time for a game of Quidditch. My husband made a quidditch court using PVC pipe, gold spray paint and hula hoops. I did not have the first clue on how to play this game, so I had one of our guests explain the rules and run the games.

Our guests could not leave without a visit to Honeydukes. Again, I had this glass case I was working on and used it as a candy display case for our guests to visit on their way out.

I bought a chocolate frog mold and put the frogs into boxes printed onto cardstock. (8)
I also made the Bertie Bott's Every Flavour Beans boxes by printing out the template onto cardstock, cutting out the widows and then covering those windows from the inside of the box with Press n' Seal. I think this took the longest to prepare out of all our projects. Each guest got to pick whatever they wanted, but only one chocolate frog and one Bertie Bott's Every Flavour Beans box each. (9)


This was a fun party to plan. Because I was not as familiar with Harry Potter it took a bit more time to plan than expected.
Some links are affiliate links.
(1) Invitations https://www.etsy.com/listing/480829742/harry-potter-invitation-birthday-party?ref=shop_home_feat_1&frs=1
(2) Hogwarts Wax Seal https://amzn.to/2OqyWwR
(3) Red Brick Backdrop https://amzn.to/3rKiZjd and 9 3/4 sign https://i.pinimg.com/originals/0a/f4/63/0af463fd4d7a22472c56b1632dd585a7.jpg
(4) Potion Vials for neckalces https://amzn.to/3aUgpjT and necklaces https://amzn.to/3aWPeoy
(5) DIY wands https://oneshetwoshe.com/harry-potter/
(6) Harry Potter Potion Labels (The store no longer has these labels listed but if you contact they owner, she may make a special listing for you) https://www.etsy.com/shop/ArtGraphicMagic?ref=yr_purchases
(7) Bottles for Butter Beer https://amzn.to/2Z2ca0g Butter beer labels https://www.etsy.com/shop/ArtGraphicMagic?ref=yr_purchases
Butter Beer Recipe https://www.favfamilyrecipes.com/butterbeer/
(8) Chocolate Frog Mold https://amzn.to/2Z6JcMU Chocolate Frog Boxes https://images-wixmp-ed30a86b8c4ca887773594c2.wixmp.com/f/1c180f50-a62f-425f-83f8-ae59bbc4f1a7/d5dziaz-1a9bee50-cbb4-4c21-a294-5acc307bc942.jpg?token=eyJ0eXAiOiJKV1QiLCJhbGciOiJIUzI1NiJ9.eyJzdWIiOiJ1cm46YXBwOiIsImlzcyI6InVybjphcHA6Iiwib2JqIjpbW3sicGF0aCI6IlwvZlwvMWMxODBmNTAtYTYyZi00MjVmLTgzZjgtYWU1OWJiYzRmMWE3XC9kNWR6aWF6LTFhOWJlZTUwLWNiYjQtNGMyMS1hMjk0LTVhY2MzMDdiYzk0Mi5qcGcifV1dLCJhdWQiOlsidXJuOnNlcnZpY2U6ZmlsZS5kb3dubG9hZCJdfQ.OQL-keCX7bI37P1Vvf6QtweFa9eA_1H7n8WHUUpsClQ
Honeydukes Candy Labels ( I do not see these currently available in this store but they do say to ask if you need a specific theme. https://www.etsy.com/shop/SherbetLime?ref=yr_purchases&search_query=Honeydukes
(9) Bertie Bott's Every Flavour Beans Box https://www.deviantart.com/littlefallingstar/art/Bertie-Botts-Every-Flavour-Beans-322870127